This is a light introduction to scripting in Autodesk Maya using the Python programming language with the PyMel library. It is intended to get you, as an artist to streamline your workflow, save time, and to further enable you to do what you do best =) But how? And what is PyMel? According to the official documentation:
PyMEL makes python scripting in Maya work the way it should. Maya’s command module is a direct translation of MEL commands into python functions. The result is a very awkward and unpythonic syntax which does not take advantage of python’s strengths – particularly, a flexible, object-oriented design. PyMEL builds on the cmds module by organizing many of its commands into a class hierarchy, and by customizing them to operate in a more succinct and intuitive way.
If that was a bit much, fret not! Our purpose here is to demonstrate some simple things you can do in Maya with the power of scripting. We won’t be diving deep into the fundamentals of programming or the Python programming language here. This introduction assumes that you have little to no programming or scripting experience. With that said, I would recommend reading up more about it, especially if you think you’ll eventually want to get more serious about scripting and programming in Maya or beyond. For our purposes, it is best to follow along in Maya; everything here is tested in Maya 2015.
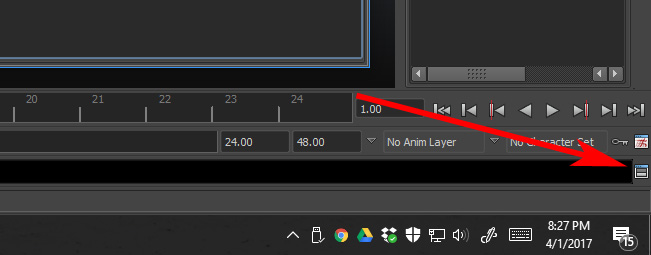
First thing’s first. Open up Maya and click on the Script Editor icon all the way in the bottom-right.
Maya’s script editor will open like so.
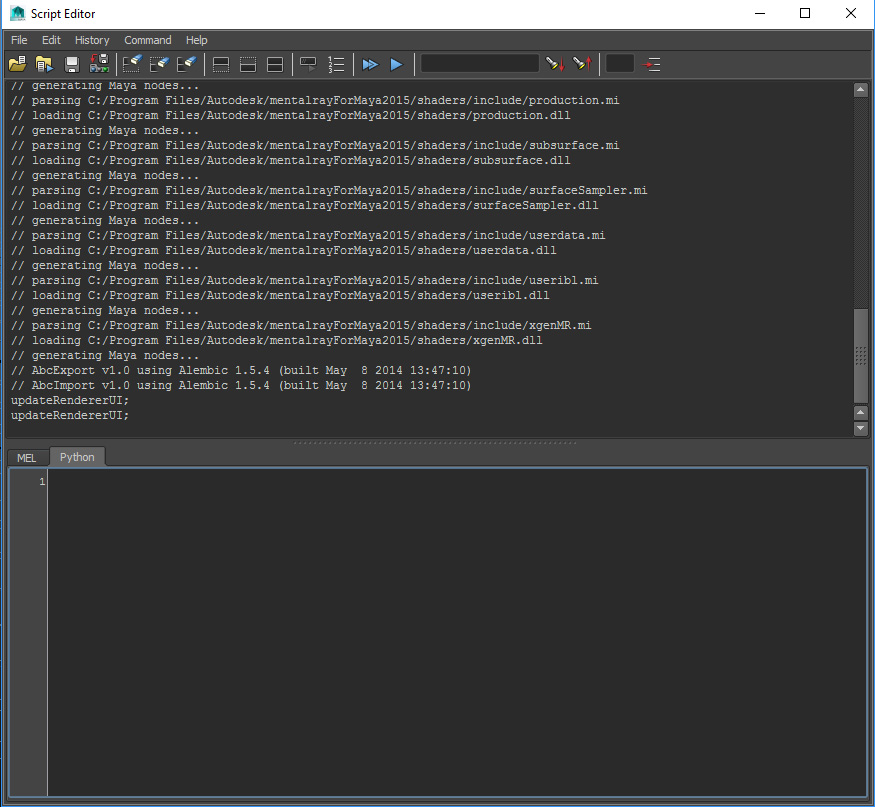
The top half of the script editor window, also known as the console, is where data is output to you, line by line as a result of what you input and execute from the bottom half of the window. The bottom half is where we will type our Python code. Before we continue, make sure that you are on the Python tab as shown above. Let’s take a look at the code snippet below.
# Importing the Maya commands library
import pymel.core as pm
print("Hello, world!")
Three things are happening here:
- The first line is a comment. In Python, inserting a single-line comment is as simple as starting it off with a ‘#’ symbol. Comments are not executed and are simply ignored when you run your script. Among other purposes, comments are useful for making notes about the actual code you are writing.
- On the second line, we import the PyMel library so that we can access all of the wonderful commands specific to Maya. You will need to do this whenever you want to utilize PyMel when writing Python scripts. We state ‘as pm’ at the end of the line because we are assigning a shortcut of “pm” in order to refer to any commands we may want to call from the PyMel library later on. More on this later.
- On the third line, we have one of the most basic pieces of code you can run. As an example, here we explicitly want to output the string ‘Hello, world!’ to the console. What is a string, you ask? We’ll get to that in a bit!
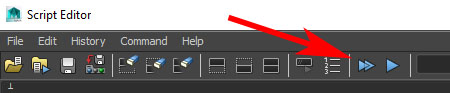
To run the code, click on the ‘ExecuteAll’ icon on top of the Script Editor window.
Alternatively, you can also run your code by highlighting all of it by pressing CTRL+A, and then pressing CTRL+ENTER. There are a few other ways to run your code and even save them out as a file you can distribute, but we won’t get into that here. Run the code and see what happens. The console should have “printed” out the phrase ‘Hello, world!’.
Now, let’s kick it up a notch. We’re going to create a very simple staircase. A few programming concepts will be introduced here. No need to feel overwhelmed! We’ll walk through this step by step.
import pymel.core as pm

# These are variables
steps = 5
posY = 0.5
posZ = 0

# This is a type of loop
while (steps > 0):
    pm.polyCube(width=4)
    pm.move(0, posY, posZ)
    steps -= 1
    posY += 1
    posZ -= 1
Don’t let the numbers scare you. Programming allows you to do powerful things with simple math operations such as addition and subtraction. Let’s look at what’s going on here. In the beginning, we import the PyMel library (remember, this enables the numerous Maya commands that are now at our disposal!). In the second section, we are assigning values to 3 variables. Variables are ubiquitous to programming languages such as Python. So what is a variable?
Variables:
A variable acts as a container for some kind of data type. Data types could be:
- An integer: Whole numbers such as 4, 7675, 39, etc
- A float: Decimal numbers such as 0.5, 0.83, -0.07, etc
- A string: A a list of characters, kind of like a sentence. Remember ‘Hello, world!’? That is a string!)
There are other data types as well, but we won’t get into all of it here. In our case, we are assigning the integer ‘5’ to the variable we named as ‘steps’. We are assigning the float of ‘0.5’ to ‘posY’, and so on.
Read more about variables and data types here.
Loops:
The last section is a type of loop. In this case, we are using a “while” loop. This means that while the statement within the parentheses is true, the code below it will be executed until it is no longer true. Here, we state that while the value of “steps” is GREATER than 0, the following five lines of code will be executed over and over until ‘steps’ is no longer GREATER than 0. But wait, didn’t we assign the variable ‘steps’ to a value of 5 earlier? How could (steps > 0) ever become false? We’ll get to that soon, hang in there!
Read more about loops (and conditionals) here.
PyMel Commands:
Let’s take a look at the first line of code within this loop. Here, we are creating a polygon cube object with a single property, setting its width to 4 Maya units. Dissecting the code, we see that ‘pm’ is prepended to the command ‘polyCube’. Remember when we imported the PyMel library of commands ‘as pm’? We must prepend any PyMel command we call with ‘pm’ since that is the shortcut we assigned to access those commands, otherwise Python will not know that we are calling PyMel commands!
Also, notice the indentations of these lines of code. Indentations matter in Python. If these lines of code weren’t indented, Python wouldn’t know that they are a part of the while loop and you may get unexpected results. Keep this in mind!
On the next line, we are once again, calling a command (also known as a function) from the PyMel library. This time, we are calling the ‘move’ function on the polygon cube we just created, along with our desired XYZ coordinate of where we want to move this object. We see that the first value is 0, which means we are not translating the object on the X-axis at all. The second value is ‘posY’, which we previously assigned 0.5. And the third value, ‘posZ’ represents 5.
Increment and decrement values:
The last three lines do a few things for us, and are also important concepts of programming in general. Taking a look at ‘steps -= 1’, we are subtracting (decrement) the value of ‘steps’ by 1 at each iteration of the loop. ‘steps -= 1’ is functionally the same thing as ‘steps = steps – 1’. We are subtracting 1 from ‘steps’ (which in this case is 5) and assigning the result of that back to the ‘steps’ variable, which now becomes 4.
So, remember the loop? It will continue to run until ‘steps’ reaches 0, in which case ‘steps > 0’ will no longer be true and the loop will be skipped. Since there is no code after our loop, the program ends!
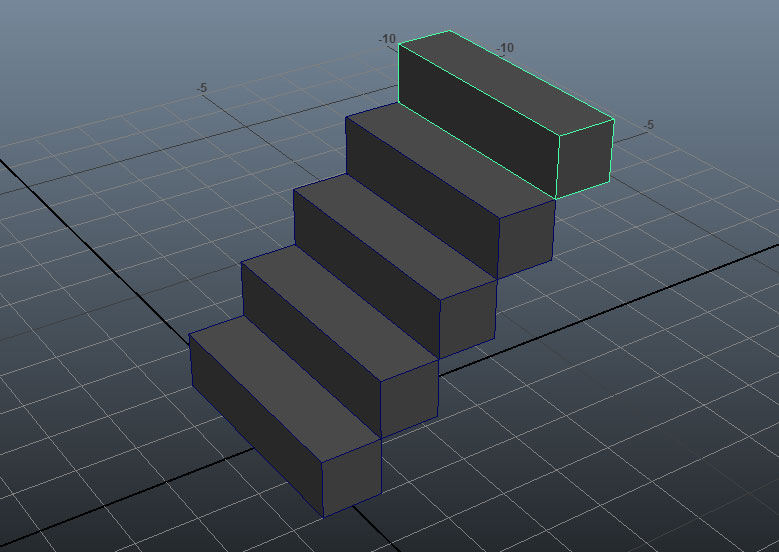
The last two lines echo the same concept. ‘posY’ increments up by 1 and ‘posZ’ decrements down by 1. What this means is that our second cube is created and moved on the Y-axis to a position of 1.5 units (remember, we initially assigned ‘posY’ to 0.5) and on the Z-axis to a position of -1. So, what happens at the next iteration of our loop? The third cube that’s created is moved to a Y-axis position of 2.5 and a Z-axis position of -2, and so on until the loop ends. If you execute the code as is, you should see this in your Maya scene:

Congratulations on making it to the end of this humble tutorial. I hope it managed to shed at least some light on a few basic things you can do in Maya through the power of scripting. It’s okay if you did not understand every concept, as practice and prolonged exposure is really the only way to become more comfortable with it. I encourage you to play around with the example we went through. For example, you can tweak the width of the steps (polyCubes) that are created and even the number of steps to create (hint: see the ‘steps’ variable). The sky is the limit!
Additional resources:
- A great resource on learning Python scripting in Maya by Chad Vernon: http://www.chadvernon.com/blog/resources/python-scripting-for-maya-artists/
- The official PyMel reference documentation: http://help.autodesk.com/cloudhelp/2016/ENU/Maya-Tech-Docs/PyMel/modules.html
- A nice consolidation of Python resources for beginner programmers: https://wiki.python.org/moin/BeginnersGuide/NonProgrammers